Saturday, June 9, 2012

Jelastic : A better Cloud Hosting Solution for Java

Lets try Jelastic Cloud hosting solution which is far better and easier solution than Google App Engine.
The other cloud hosting Solution which are getting popular these days are Cloud Foundry and OpenShift.
i am not going to compare all these hosting solution but try to getting started with Jelastic which
offer a very user friendly UI to setup your application environment.
I am trying to setup my small application on the Jelastic platform its not that tough as I was thinking it
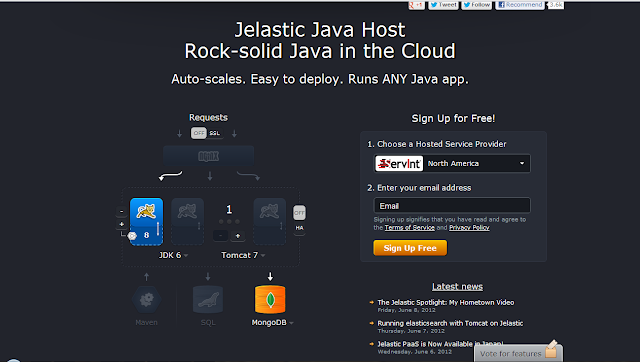
the http://jelastic.com/ home page is self explanatory how you should start from.

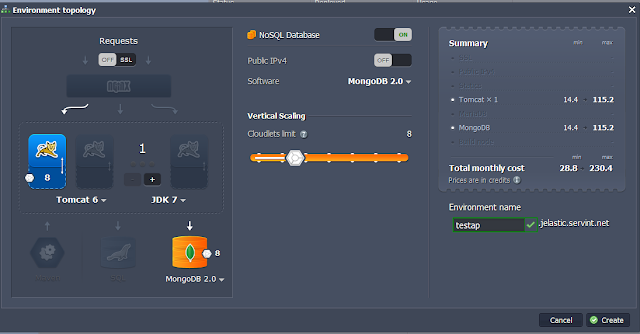
lets setup our application environment by selecting JDK 6,Tomcat 6 and MongoDB as our NoSQL database,choose
your hosting provide and signup for free


Login with the password sent by jelastic to your registered mail address
provide enviornment name and press create


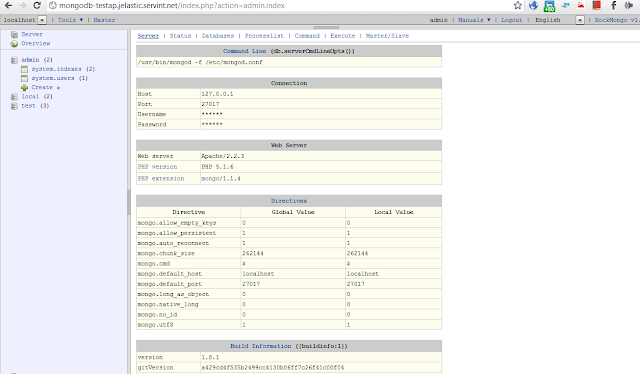
After pressing the create button jelastic takes some time to configure your enviornment and send the MongoDB
node details to your registered mail id open the RockMongo (MongoDB web UI) with the help of provided userid and password.

Setup MongoDB configuration like database name,collection name etc with the help of GUI.


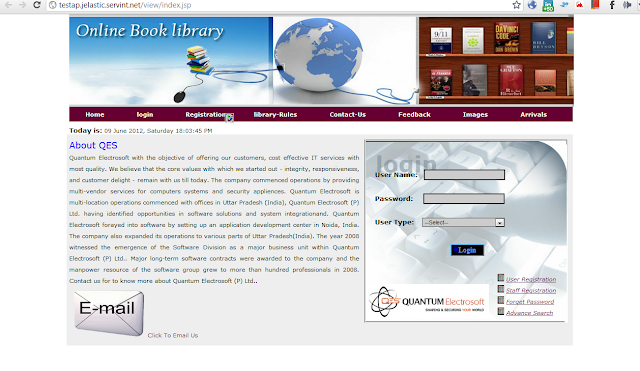
After Deploying the application Test you application on http://testap.jelastic.servint.net/view/index.jsp
And MyApp is up and Running


Spring : Working with JdbcTemplates

Spring provides JDBC Templates to access the data from the database with ease.Spring provides
org.springframework.jdbc.core.JdbcTemplate which basically take cares about all your
connection establishment to the database post query work eg closingh statement and connections.

Merits of spring templates as compared to conventinal Data access through JDBC
1. Connection Handling is done by Spring container you need not to worry about it,by this way
it reduced the singnificant amount of the coding.
2. Exception handling in conventional data access through JDBC is very cumbersome process,
here Spring take care of all these stuff by converting SQLException to the RuntimeException
3.ResultSetExtractor or RowMapper which allows result directl into the Object ResultSetExtractor
or a list of objects RowMapper.

Lets have a walk through how to work with JdbcTemplates

Step 1: Create your database as fallows,Here I am using MySQL as database.


Step 2: Create the Java Project and add Spring framework jar library to it.
Step 3: Create spring.xml as shown


Step 4:
Create Employee Model Class as shown
package com.example.model;

public class Employee {
 
 private int empid;
 private String empName;
 
 public Employee(int empid,String empName){
  this.empid = empid;
  this.empName = empName;
 }
 
 public int getEmpid() {
  return empid;
 }
 public void setEmpid(int empid) {
  this.empid = empid;
 }
 public String getEmpName() {
  return empName;
 }
 public void setEmpName(String empName) {
  this.empName = empName;
 }
 

}

Step 5:Create the Data Access Object as fallows
package com.example.dao;

import java.sql.Connection;
import java.sql.DriverManager;
import java.sql.PreparedStatement;
import java.sql.ResultSet;
import java.sql.SQLException;

import javax.sql.DataSource;

import org.springframework.beans.factory.annotation.Autowired;
import org.springframework.jdbc.core.JdbcTemplate;
import org.springframework.stereotype.Component;

import com.example.model.Employee;
@Component
public class EmpDaoImpl {
 
 @Autowired
 private DataSource dataSource;
 
 public void create(int empid, String employee_name) {
  JdbcTemplate jdbcTemplate = new JdbcTemplate(dataSource);
  jdbcTemplate.update("INSERT INTO EMPLOYEE (empid, EMPLOYEE_NAME) VALUES(?,?)",
    new Object[] { empid, employee_name });
 }
 
 public DataSource getDataSource() {
  return dataSource;
 }

 public void setDataSource(DataSource dataSource) {
  this.dataSource = dataSource;
 }

}

Step 6: Create your main class as fallows to check whether all these things are in right shape.
package com.example;

import org.springframework.context.ApplicationContext;
import org.springframework.context.support.ClassPathXmlApplicationContext;

import com.example.dao.EmpDaoImpl;
import com.example.model.Employee;

public class Main {
 
 public static void main(String[] args) {
  
  ApplicationContext ctx = new ClassPathXmlApplicationContext("spring.xml");
  EmpDaoImpl empdl = ctx.getBean("empDaoImpl",EmpDaoImpl.class);
  
  empdl.create(1, "Sharad Singh");  
  
  System.out.println("Data Inserted In Database");
 }

}

Output @ console:
log4j:WARN No appenders could be found for logger (org.springframework.core.env.StandardEnvironment).
log4j:WARN Please initialize the log4j system properly.
log4j:WARN See http://logging.apache.org/log4j/1.2/faq.html#noconfig for more info.
Data Inserted In Database

Step 7:
Look into the database table whether data has been updated or not,Here you go......


Friday, June 8, 2012

Spring : Working with DataSource and Database Connection Pooling

Getting Database connection through conventional JDBC is very tedious task which include a lot
Exception handling and repeative coding,Spring simplifies the whole process with very ease.
Spring provides the org.springframework.jdbc-3.1.0.RELEASE.jar whic contains the org.springframework.jdbc.datasource.DriverManagerDataSource to get the connection
object to the Database.

For the production environment we can use org.apache.commons.dbcp to implement the connection
pooling,here I summarize how we implement the connection pooling in spring framework.
Step 1: The very first step is to create the Java project and add the Spring Library as fallows


Step 2:Setup the database,in this example i am using MySQL as a database,ensure MySQL database driver jar
should be in the class path.
Step 3:Crate the spring.xml file in source folder as fallows

<?xml version="1.0" encoding="UTF-8"?>
<beans xmlns="http://www.springframework.org/schema/beans"
 xmlns:xsi="http://www.w3.org/2001/XMLSchema-instance"
 xsi:schemaLocation="http://www.springframework.org/schema/beans http://www.springframework.org/schema/beans/spring-beans.xsd
  http://www.springframework.org/schema/context http://www.springframework.org/schema/context/spring-context.xsd"
  xmlns:context="http://www.springframework.org/schema/context">

 <context:annotation-config/>
 <context:component-scan base-package="com.example"/>
 
 <bean id="dataSource" class="org.apache.commons.dbcp.BasicDataSource">
  <property name="driverClassName" value="com.mysql.jdbc.Driver"/>
  <property name="url" value="jdbc:mysql://localhost:3306/HibernateDb"/>
  <property name="username" value="root"/>
  <property name="password" value="root"/>
  <property name="initialSize" value="2"/>
  <property name="maxActive" value="5"/>
 </bean>
 

</beans>

Step 4: Create your Model Class as fallows
package com.example.model;

public class Employee {
 
 private int empid;
 private String empName;
 
 public Employee(int empid,String empName){
  this.empid = empid;
  this.empName = empName;
 }
 
 public int getEmpid() {
  return empid;
 }
 public void setEmpid(int empid) {
  this.empid = empid;
 }
 public String getEmpName() {
  return empName;
 }
 public void setEmpName(String empName) {
  this.empName = empName;
 }
 

}

Step 5: create DataAccessor Object to get the data from database

package com.example.dao;

import java.sql.Connection;
import java.sql.DriverManager;
import java.sql.PreparedStatement;
import java.sql.ResultSet;
import java.sql.SQLException;

import javax.sql.DataSource;

import org.springframework.beans.factory.annotation.Autowired;
import org.springframework.stereotype.Component;

import com.example.model.Employee;
@Component
public class EmpDaoImpl {
 
 @Autowired
 private DataSource dataSource;
 
 public Employee getEmployee(int empid) throws Exception{
  
  Connection conn = null;
  conn = dataSource.getConnection();
  PreparedStatement ps = conn.prepareStatement("select * from employee where empid = ?");
  ps.setInt(1, empid);
  
  Employee emp = null;
  ResultSet rs = ps.executeQuery();
  
  if(rs.next()){
   emp = new Employee(empid, rs.getString("employee_name"));
  }
  rs.close();
  ps.close();
  
  return emp;


 }

 public DataSource getDataSource() {
  return dataSource;
 }

 public void setDataSource(DataSource dataSource) {
  this.dataSource = dataSource;
 }

}

Step 6: Now test your prog by using your Main Class as shown

package com.example;

import org.springframework.context.ApplicationContext;
import org.springframework.context.support.ClassPathXmlApplicationContext;

import com.example.dao.EmpDaoImpl;
import com.example.model.Employee;

public class Main {
 
 public static void main(String[] args) {
  
  ApplicationContext ctx = new ClassPathXmlApplicationContext("spring.xml");
  EmpDaoImpl empdl = ctx.getBean("empDaoImpl",EmpDaoImpl.class);
  
  Employee emp = null;
  try {
   emp = empdl.getEmployee(1);
  } catch (Exception e) {
   // TODO Auto-generated catch block
   e.printStackTrace();
  }
  
  System.out.println(emp.getEmpName());
 }

}
Output


Thursday, June 7, 2012

Convert JSON to DBObject

Conversion of JSON to DBObject need JSON parsing only here I attach the simple
code to understand it.
package com.test;

import java.net.UnknownHostException;

import com.mongodb.DB;
import com.mongodb.DBCollection;
import com.mongodb.DBCursor;
import com.mongodb.DBObject;
import com.mongodb.Mongo;
import com.mongodb.MongoException;
import com.mongodb.util.JSON;

public class ConvertJSON2DBObject {
 public static void main(String[] args) {
  try {
   Mongo mongo = new Mongo("localhost",27017);
   DB db = mongo.getDB("myDBName");
   DBCollection collection = db.getCollection("myCollectionName");
   
   //convert JSON to DBObject
   DBObject dbObject = (DBObject) JSON.parse("{'empName':'Rajkumar Singh','emppId':62990}");
   collection.insert(dbObject);
   
   DBCursor cursor = collection.find();
   
   while(cursor.hasNext()){
    System.out.println("OBJ IS : "+cursor.next());
   }
  } catch (UnknownHostException e) {
   // TODO Auto-generated catch block
   e.printStackTrace();
  } catch (MongoException e) {
   // TODO Auto-generated catch block
   e.printStackTrace();
  }
  
 }

}


Java MongoDB Tutorial

Working with MongoDB with java involves few steps
Step 1: include the java driver into the CLASSPATH
Step 2: start the mongodb service if installed
here is the demo code

package com.test;

import java.net.UnknownHostException;
import java.util.HashMap;
import java.util.Map;
import java.util.Set;

import com.mongodb.BasicDBObject;
import com.mongodb.DB;
import com.mongodb.DBCollection;
import com.mongodb.DBCursor;
import com.mongodb.Mongo;
import com.mongodb.MongoException;

public class MongoHelloJava {

 public static void main(String[] args) {
  try {
   //Demonstrate simple hello java program with mongoDB
   
   System.out.println("Demonstarting simple insert and retrivel in MongoDB");
   // connect to mongoDB on default port and IP address
   Mongo mongo = new Mongo("localhost",27017);
   
   // getDB() return the database from MongoDB,
      //  mongoDB will create database automatically if not existed
   DB db = mongo.getDB("myMongoDB");
   
   // getCollection() returns the collection from MongoDB
   // mongoDB will create collection automatically if not existed
   DBCollection collection = db.getCollection("myCollection");
   
   // create a document to store key and value
   BasicDBObject document = new BasicDBObject();
   document.put("id", 1000);
   document.put("print", "hello  Java");
   
   // save it into collection named "myCollection"
   collection.insert(document);
   
   // query for searching perticular id
   BasicDBObject query = new BasicDBObject();
   query.put("id", 1000);
   
   // fire query
   DBCursor cursor = collection.find(query);
   
   // iterate through cursor
   while(cursor.hasNext()){
    System.out.println(cursor.next());
   }
   
   // Demonstrate getCollection() and getCollections()
   System.out.println("Demonstrate getCollection() and getCollections()");
   Set<String> collections = db.getCollectionNames();
    

   for (String collectionName : collections) {
   System.out.println(collectionName);
   }


   //get a particular collection
     DBCollection collection1 = db.getCollection("myCollection");
   System.out.println("Collection Name is : "+collection1.toString());
   
   //insert the data into the database
   BasicDBObject document1 = new BasicDBObject();
   document1.put("post", "rajkrrsingh.blogspot.com");
   document1.put("author", "Rajkumar Singh");
   
   BasicDBObject comments = new BasicDBObject();
   comments.put("user1", "text1");
   comments.put("user2", "text2");
   comments.put("user3", "text3");

   document.put("comment", comments);
   collection.insert(document1);
   System.out.println("document1 inserted succesfully");
   
   //insertion of the data into the database through map
   Map<String, Object> documentMap = new HashMap<String, Object>();
   documentMap.put("post", "rajkrrsingh.blogspot.com");
   documentMap.put("author", "Rajkumar Singh");
    
   Map<String, Object> commentMap = new HashMap<String, Object>();


   commentMap.put("user1", "text1");
   commentMap.put("user2", "text2");
   commentMap.put("user3", "text3");
    
   documentMap.put("comment", commentMap);
    
   collection.insert(new BasicDBObject(documentMap));
   
   DBCursor cursor1 = collection.find();
   while (cursor1.hasNext()) {
    System.out.println(cursor1.next());
   }
   
  } catch (UnknownHostException e) {
   e.printStackTrace();
  } catch (MongoException e) {
   e.printStackTrace();
  }

 }

}


Result


Wednesday, June 6, 2012

All About MangoDB


NoSql DB is one of the latest trends in the market which most of the big names in the industry are investing in and are getting benefited by its huge spectrum of features. The common feature associated with NoSQL are Storing huge Data & Scaling up Storage, Interconnected Data, Complex Data Structure, High performance and Flexibility with schema less approach.

Major Internet giants like Facebook, Twitter, Digg, Amazon, LinkedIn, craigslist, Foursquare and Google all use NoSQL in one way or another because of the significantly different challenges in dealing with huge quantities of data that the traditional RDBMS solutions could not cope with.


MongoDB (from "humongous") is a scalable, high-performance, open source, document based NoSQL database used by company like craigslist, Foursquare, Disney, MTV and many more.


Tuesday, June 5, 2012

MongoDB Tutorial : Getting Started

MongoDB is no SQL,open source database, written purely in C++, basically store the database in the document form.
based on the JSON approach,can be horizontally scalable,can be index on any attribute

Here are the best practise to use


How to download and Install MongoDB
Download the MongoDB from the MongoDB website as depicted in the picture as per your
plateform,here I am downloading it for the Windows 32 bits.


Download the relevent Driver to work for
The fallowing page shows the link for the driver,Here I am working with the Java Driver.


Review the downloaded bineries
After downloading MongoDB,extract the zip file which contains the fallowing exe files as shown in the image.


Installing the MongoDB server
Intalling the MongoDB server is not a time taking process,just open the command prompt and go the location of bin of the unzipped folder,in the meanwhile create the
database folder as MongoDB does not create the database itself.

execute the fallowing command mongod --dbpath "f://mongodatabase"
and press enter the fallowing screen show the out that your server is up and running on the default port 27017


Test your DB Installation
Open the web browser and type the fallowing addres http://loacalhost:27017/
The webpage displays the welcome page of mongoDB same as the image shown.


Connect to MongoDB
Open the command prompt, open the bin location


run the MongoDB as a Windows Service
open the command prompt and execute the fallowing command
mongod --dbpath "f:\mongodatabase" --logpath "f:\mongodatabase\logs.txt" --install --serviceName "MongoDB"
here shown the output on the console


The Next step is to verify from the service manager


Uninstall
Use the remove command shown in the image.


Create Database in the MongoDB
MongoDB does not provide any command or syntex to create database as provided with the relationship based
database,it creates the database on the fly when you try to insert the values first time in the database.

on the shell use show dbs command which shows the local(empty) database


use databasename command will create your MongoDB,but the database has not been created yet you can
verify the same by using show dbs command.
The database only created when you try to insert some document into the database
Define a collection name as employee and let try to insert some document inside it